
Never hit the garage wall again: an ESP32 parking sensor

Every garage has the same problem. Pull in too far and you hit the wall, the shelf or the bikes. Stop too short and the door won't close. Tennis balls on strings work, but they're a bit last century.
So we built a small box that sits on the back wall and does the job with lights: green when you have room, yellow when you're getting close, red when it's time to stop. It has been in daily use in our own garage since April.
What it does
A laser distance sensor watches the car coming in. Three LEDs show how much room is left, and a small web page on your phone lets you set the exact stopping point.
| Distance from your stop point | LEDs |
|---|---|
| More than 80 cm away | Green |
| 40–80 cm | Green and yellow |
| 10–40 cm | Yellow and red |
| Last 10 cm | Red |
| Past the stop point | Red, flashing |
When the car hasn't moved for 30 seconds the lights switch off, so they're not glowing all night. Move the car again and they wake straight back up.
The parts
- ESP32-C3 Zero — a tiny ESP32 board with Wi-Fi and a USB-C port
- VL53L1X time-of-flight sensor — measures distance with an invisible laser. In long-distance mode it reaches a few metres; how far exactly depends on the light in your garage and how reflective the car is
- Three LEDs — green, yellow and red. We used 10 mm ones for visibility from the driver's seat, but 5 mm LEDs work fine
- Three 220 Ω resistors, one per LED
- Jumper wires and a USB-C power supply
Wiring
The sensor talks to the ESP32 over I²C, so it needs only four wires. Each LED goes to its own pin through a 220 Ω resistor.
| Connection | ESP32-C3 pin |
|---|---|
| Sensor SDA | GPIO 5 |
| Sensor SCL | GPIO 6 |
| Sensor VIN / GND | 3.3 V / GND (check your sensor board's voltage range) |
| Green LED | GPIO 2 |
| Yellow LED | GPIO 3 |
| Red LED | GPIO 4 |
Setting the stop point from your phone
The ESP32 creates its own little Wi-Fi network called ParkingSensor. Join it on your phone and open the sensor's address in the browser to get a live distance reading.
On an ESP32 running its own network this address is usually 192.168.4.1, but don't
take our word for it: the firmware prints the real address to the serial monitor when it
starts up, as a line like WiFi AP: ParkingSensor IP: 192.168.4.1. Use whatever yours
shows. If you change the network name or password in the code, use your own values too.
To calibrate, park the car exactly where you want it to stop and tap one button. That distance becomes the stop point, and every coloured zone is measured from it. The setting is saved in the ESP32's memory, so it survives power cuts and load-shedding.
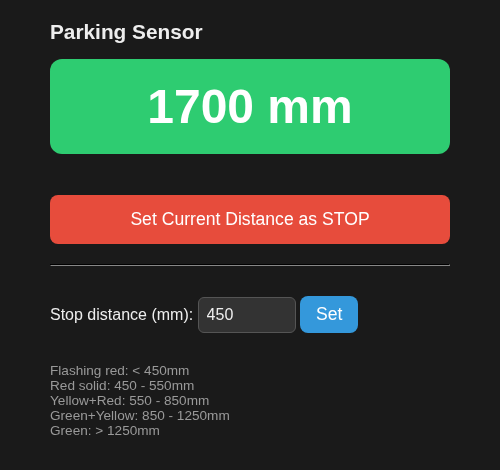
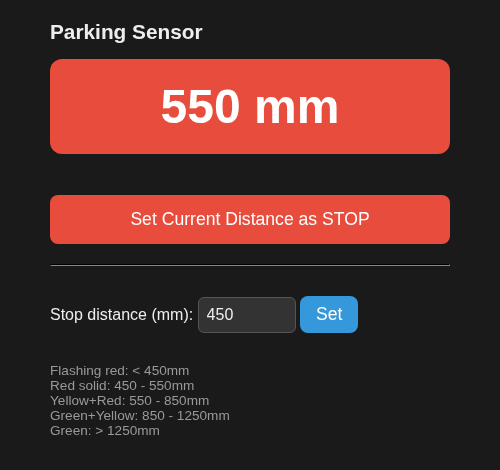
The set-up page on a phone: far away on the left, nearly at the stop point on the right.
Three things we learned
1. Smooth the readings. A single laser reading jumps around by a few millimetres. The firmware averages the last five good readings, which stops the LEDs flickering between zones.
2. Throw away the bad ones. The VL53L1X reports a status with every reading. At the edge of its range it often returns status 7, a "wrap-around" reading that can look like the car is suddenly very close. Anything with a status other than 0 is ignored.
3. The ESP32-C3 Zero needs two build flags for USB serial. Without them the board flashes fine but prints nothing to the serial monitor. In PlatformIO, add:
build_flags = -DARDUINO_USB_MODE=1 -DARDUINO_USB_CDC_ON_BOOT=1Download the code
Download the parking sensor code (ZIP) —
the PlatformIO project with the full firmware and a short read-me. Change the Wi-Fi
name and password at the top of src/main.cpp before you install it.
Prefer to build it with an AI assistant? Download the AI build guide, upload it to ChatGPT, Claude or Gemini and say "Help me build this project". It asks which parts you have first, then walks you through the parts list, wiring, code, testing and installation for your own board.
Make it yours
The zone distances are three numbers at the top of the code, so it's easy to make the green zone start earlier for a long driveway or tighten everything up for a small garage. You could swap the LEDs for a buzzer, or add a second sensor for a two-car garage.
Need parts for your own version? Browse the shop, or ask us to source anything we don't stock.